Theres Always Room For Mushrooms!
By Alex Chung
Senior Food Writer at Pro Home Cooks
Portobello mushrooms were the only kind of mushroom I had as a kid. They would appear in my pizza and pastas and I would HATE it. They were soft & tasted like the earth. I was not a fan and decided that mushrooms were gross and I swore off. I would never have another mushrooms so long as I could help it. Then there was a moment, I learned that not all mushrooms are alike and that I actually did like them, just not portobellos. Even to this day portabella mushrooms are still on the bottom of the list for me. However, there is a medley of mushrooms out there that I do love. Shitaki mushrooms seared in butter… delicious. Enoki mushrooms tossed into a stir fry… amazing. Trumpet mushrooms sliced thinly & topped into some ramen… yes, please. So, I thought I would inspire you this week to pick up as many different kinds of mushrooms that you can and have fun in the kitchen with them.
Plus, has anyone been reading about the capability of mushrooms. Not only are they delicious but people are working turning mushrooms into boats, energy, insulation for houses, a water filter, and an alternative to plastic and leather. How freaking epic!
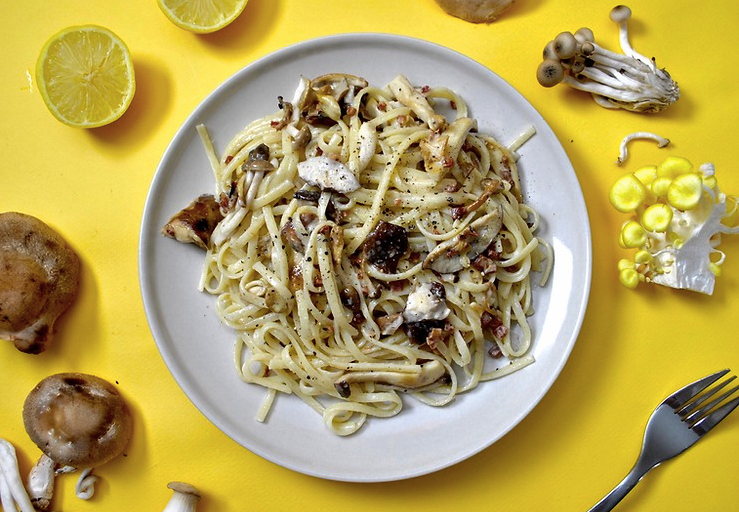
Creamy Mushroom Linguini
Searing some torn up mushrooms in olive oil, pancetta, and garlic not only smells delicious but also tastes amazing. They get a nice golden brown sear and absorb all the flavors you cook them with so use some of your favorite spice and herbs when you’re cooking up those mushrooms! I also love love love an assortment of mushrooms. The all have different colors, textures and flavors but my faves are shiitake, golden oyster, king trumpet, and pioppino mushroom!

Ingredients:
- 6 oz. of Linguine
- 2 Tbsp. of diced Pancetta
- 2 Tbsp. of Olive oil
- 1 clove of chopped garlic
- 1 lb Assorted Mushrooms
- 2 Tbsp. Cream
- 2 Tbsp. of Pasta water
- Lemon juice
- Freshly cracked black pepper
Instructions:
- In a large pot, bring salted water up to a rapid boil & add in the linguine. Cook according to the package.
- In a large stick pan, set the flame to a medium high and cook the pancetta until they become brown and their fat has been rendered out.Keeping the pancetta fat in the pan, scoop out the cooked pancetta and set aside for later use.
- To the pancetta fat, add in oil, garlic, and the torn & cleaned mushrooms. If necessary, spread the mushrooms into a single layer with every mushroom touching the pan.
- Sear the mushrooms for about 2 mins before flipping them to searing for another 2 mins.
- Once the mushrooms have been seared on both sides, add in the cream, pasta water, and drained pasta to the mushrooms.Keeping the heat on, stir to combine all the ingredients.
- Lastly, squeeze in a little bit of lemon, crack in some black pepper, and add in the cooked pancetta. Take off the heat and enjoy immediately!!
Winter Melon & Enoki Mushroom Soup
This soup has been my favorite for the past week. I’ve had it as a small side with every meal now that it has been colder. But I especially love it in the morning with a bowl of rice for breakfast. It’s an easy soup to make and its taste super clean and is so soothing. The winter melon is slightly sweet with a very soft and tender texture. Although this recipe doesn’t call for much it taste amazing! Plus, you can always add other ingredients and the melon will absorb those flavors.

Ingredients:
- 1 pound of winter melon
- 1 – 2 ounce pack of enoki mushrooms
- 2 cups of water or stock
- 1 knob of ginger
- 1 clove of garlic
- 1 teaspoon of salt
- pinch of black pepper
- Scallion, optional garnish
Instructions:
- Start by peeling the skin off the winter melon and deseeding if necessary. Cut into cubes and set aside.
- Take the mushroom out of the package and cut off the roots. They should still be intact so you rip them into 15 smaller sections. This is just to make eating a bit easier.
- In a large pot, add in the cubed winter melon, mushrooms, and the rest of you ingredients. Bring to a boil and cook until the winter melon is fork tender. This should be about 15 – 20 minutes.
Shiitake Congee

I’m sure I’m biased but I think congee is one of the best breakfasts out there. Its filling without being to heavy. It uses few ingredients, serves a ton of people and is extremely versatile. This morning I topped my congee off with some shiitake caps seared in butter. How good does that sound? Mushrooms can really soak up tons of flavor when you’re cooking them so using them as a topping for a plain congee is the best! I also add some scallion, garlic chili crisp and pickled mustard greens for a spicy kick and crunch.

Ingredients:
- 1/4 cup of rice
- 3 cups of water
- 1 teaspoon of salt
- 1/4 teaspoon of white pepper
- small knob of ginger
- 2 Shiitake caps per person
- Small knob of butter
- Scallions, optional
- Garlic chili crisp, optional
- Pickled mustard greens, optional
Instructions:
- Start off by combining the rice, water, salt, white pepper & ginger to a large pot. Bring this to a boil and then turn it down to a low simmer. Cook uncovered for about 30 – 45 minutes giving it a good stir every 15 minutes to make sure nothing is sticking and to break the rice up a bit.
- After the 45 minutes are up your congee should be broken down & should have a thick consistency. If you would like it to be thicker cook it for 15 more mins & if you like it to be thinner add ¼ cup of water.
- While the congee is cooking, slice your shiitake mushrooms into large slices and place them into a cast iron with 1 small knob of butter on medium heat. Let them sear on one side for 2 minutes before flipping and searing on the other side. If you see that it is too dry add in another knob of butter. Season with salt and pepper and set aside until your congee is done.
- Serve yourself a bowl of congee while it is hot & top with shiitake mushrooms. Then add in some extra optional garnishes like scallions, garlic chili crisp, pickled mustard greens, and a drizzle of soy sauce.
TOP ARTICLES

Sourdough Baking School
Master the art of sourdough bread baking in the most comprehensive baking class on the internet. This class features over three hours of baking content to help you start your sourdough journey.
See More

